10.11.2010

Natures Blossom

This tutorial is for those that have a working knowledge of PSP. This tutorial was written by me on the 22nd day of September 2010 and any resemblance is purely coincidental. I used PSP 9, but any version should work. I do not allow my tutorials to be translated and please do not claim them as your own. If you would like to share the tutorial please send a link to my blog.

Supplies Needed:

• Tubes of Choice: I'm using the work of Genniday Koufay which you can purchase here

• Scrap Kit: I'm using the PTU Midsummers Dreams kit by StacieCakes which can be purchased here.

Lets Begin!!!

1. Open a new image 600 x 600
2. Now open SC_MSD_Frame1.png and SC_MSD_Frame1.png resizing both by 75%
3. Paste both as a new layer
4. With your selection tool feather set to 10 or higher draw areas of lines or circles on the top layer
5. Hit delete on your keyboard
6. You should now have the two tone effect on your frame
7. Merge all layers visible
8. Open Leaves 2 and resize by 20%
9. Paste as a new layer on our working image
10. Erase bits and pieces to make it look like its wrapped around our frame ( repeat steps 8-10 to your liking)
11. Open paper of choice (I used SC_MSND8.jpg)
12. Paste as a new layer on our working image
13. Resize by 50%
14. Send to bottom
15. Crop off excess pieces
16. Add your tube at this time
17. Now you can add the patch of grass behind your tube to make it have the meadow behind look
18. Open flowers 1 and 2 and resize both by 7% (or to your liking)
19. Pasting them as new layers place to your liking
20. Repeat until you are satisfied with your flowers
21. Add any additional elements to your liking at this time
22. Add your copyrights and text

I Want Candy

This tutorial is for those that have a working knowledge of PSP. This tutorial was written by me on the 8th day of October 2010 and any resemblance is purely coincidental. I used PSP 9, but any version should work. I do not allow my tutorials to be translated and please do not claim them as your own. If you would like to share the tutorial please send a link to my blog.

Supplies needed:
• Tube of Choice: I am using the artwork of the talented Juicy Bits which you can purchase from Here

• Scrap Kit of choice: I am using the PTU Hallows Eve Kit from Juicy Bits which you can buy from her store HERE

Lets Begin:
1. Open Frame 02.png
2. Rotate to the left 90% all layers checked
3. Resize all layers by 75%
4. Now resize again by 75% but make sure that all layers is Unchecked
5. Open ribbon07.png
6. Resize by 75% THREE times
7. Rotate to the left 90%
8. Paste as a new layer on our working frame image and move to the left side of our frame
9. You will need to use your selection tool and crop off the excess ribbon
10. Add drop shadow of choice to your ribbon layer ( I used 0,0,100,5,black)
11. Highlight our frame layer
12. With your magic wand click inside of the frame
13. Selections- Modify- Expand by 10
14. Paste paper of choice as a new layer ( I used paper 7)
15. Selections- invert
16. Hit delete on your keyboard
17. Open your tube at this time
18. Resize if necessary to your liking
19. Paste as a new layer moving below our frame
20. Add a drop shadow of your choice
21. Open your candy spatters and resize by 70%
22. Paste to your liking and send this layer to the bottom
23. Duplicate this layer
24. Image Flip
25. Image Mirror
26. Move into place to your liking
27. Open 3 bows of choice ( I used 2,3, and 4)
28. Resize all by 75%
29. Copy first bow
30. Highlight top layer on our working image and paste as a new layer
31. Now select your second bow and paste as a new layer
32. Image Mirror
33. Now your last bow
34. Paste as a new layer but resize again by 75%
35. Now duplicate that layer
36. Now line up your bows on the left ( look at my tag for reference)
37. Open flair of choice I used flair03.png
38. Resize by 30% and again by 75%
39. Paste in the center of our bows
40. Open tag01.png
41. Resize to your liking and paste as a new layer on our working image
42. Move below our flair layer
43. Open pumpkin of choice and resize to fit on our tag
44. Lower the opacity to your liking
45. Add text of choice and copyrights
46. Export as a PNG
We are finished!!!

10.07.2010

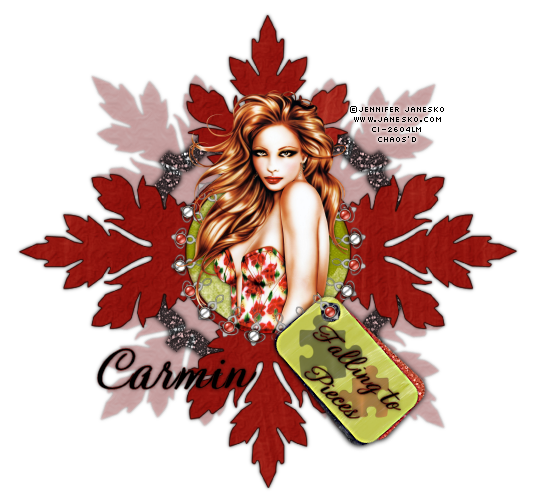
Falling to Pieces

This tutorial is for those that have a working knowledge of PSP. This tutorial was written by me on this 7th day of October 2010 and any resemblance is purely coincidental. I used PSP 9, but any version should work. I do not allow my tutorials to be translated and please do not claim them as your own. If you would like to share the tutorial please send a link to my blog.

Supplies needed:
• Tube of Choice: I am using the artwork of the talented Jennifer Janesko which you can purchase from CILM

• Scrap Kit of choice: I am using the PTU kit Widget from Juicy Bits which you can buy from her store HERE

• Template: I am using template138 from Gina’s Gems which you can find Here

Lets Begin:

1. Open your template
2. Delete the credit info layer, bling layer, the flowers layer, rounded rectangle, and the silver swirl layer
3. Using your selection tool, select a rectangular area around the template area
4. Crop to selection
5. This brings our template in a little closer and we can resize when we are finished
6. Highlight our leafy frame layer
7. Selections-Select All- Float
8. Selections defloat
9. Open paper 5 and paste as a new layer
10. Selections- Invert
11. Hit delete on your keyboard one time
12. Now you can delete the original leaf layer (I liked the look so I left it)
13. If you want you can also add textures to your paper if you want it to stand out a bit more
14. Highlight the circle fill layer
15. Selections-Select All- Float
16. Selections defloat
17. Open paper of choice ( I used paper 9)
18. Paste as a new layer
19. Selections- Invert
20. Hit delete on your keyboard
21. Select none
22. Paste your tube to your liking at this time
23. Now duplicate your leaf layer
24. Rotate by 45%
25. Bring the opacity down between 30 and 40 or to your liking
26. Move this layer to the bottom above your background layer
27. Open Brad of choice and resize by 50% 3 or 4 times to your liking
28. Now we will paste as a new layer on to our working image
29. Placing them on the silver ornamental frame
30. Duplicate and place each one to your liking around the frame
31. Drop shadow each bead
32. Open one of your Brackets and resize by 40% and then by 50% and rotate
33. Place to your liking or look at my tag for placement
34. Duplicate Image Mirror
35. Repeat until you have 4
36. Merge these 4 layers visible and drop shadow
37. Open Tag 04 and resize by 50%
38. Paste as a new layer to your liking
39. Add text of choice to the tag
Optional Place puzzle pieces to your liking
40. Merge all layers visible and add copyrights

Thank you for trying my tutorial…. If you have any trouble please feel free to contact me…

10.04.2010

Fixing my Blog

I was aggrivated how different each post looked so I saved everything and will slowly be getting my tuts back on.... Hang in there with me I will do this in free time as  I get kits and things worked with and what not. I was getting really irritated with the look of my blog so I will fix it.... ASAP!!!

thanks for understanding!!!

Hugs and Love,

Carmin