Paint Shop Pro, Photoshop, Digital Scrapbooking, Friends, Chaos, Love and Creativity
9.02.2012
Times Past Part 2
This tutorial is for those that have a working knowledge of PSP. This tutorial was written by me on
September 2, 2012 and any resemblance is purely coincidental. I use PSP 9, but any version should work. I do not allow my tutorials to be translated and please do not claim them as your own. If you would like to share the tutorial please send a link to my blog. Thank you!
Things Needed:
Tube/Image of choice: I am using the work of the talented Barb Jensen which you can buy from her store here: http://barbarajensentubes.com/ ( the tube I used in in layered pack 29)
Kit of choice: I am using part of a collab called Times Past, I am using Krissys Scraps Part
Plugins:
Masks/Templates:
Let’s Begin:
1. Open a New image 600 x 600, We will call this our working image thru out the tutorial and we can resize when we are done.
2. Open KSTPVintage Frame 1.png and resize by 75% twice
3. Paste as a new layer on our working image
4. Click inside your frame with your magic wand
5. Selections- Modify-Expand by 10
6. Open a paper of your choosing now ( I used KSTPPaper 10.jpg) resize by 50%
7. Paste as a new layer on our working image
8. Selections – Invert
9. Hit delete on your keyboard
10. Move this layer beneath you frame layer
11. Add your tube at this time (you can put in the frame to make it look like a Picture or you can have it where she looks like she is coming out of the frame)
12. Once your happy make sure you have the tube cropped to your liking
13. Open KSTPBeaded String 1.png and resize to your liking
14. Paste as a new layer on our working image
15. Place to your liking ( I duplicated this layer and made it look like it was coming from behind the tube as well
16. Open KSTPCurly Ribbon 2.png and paste as a new layer on our working image and place to your liking
17. Open KSTPFlower 2.png and paste as a new layer on our working image and place in the center of your curly ribbon
18. Open KSTPFoliage 1.png and resize by 75% and paste as a new layer on our working image
19. Rotate to your liking and put into place
20. Duplicate and mirror once again placing to your liking
21. Now merge visible
22. Add any other elements at this time as a tut is just a guide Lets get creative!!!
23. Add your Copyrights and Text
I would love to see your results.. Please send results to me @ theycallmetig@yahoo.com
8.28.2012
New Kit "Pretty Pastels" in Stores Now!!!
I have a new kit out Today and it can be found here at Whimsical Divas This Kit is called Prtty Pastels and it has 86 elements and 14 papers. Its a very soft colored kit that will go well with some of the pretty and soft tubes that are out there. I hope someone can use it in there tags. Now for the preview:
thank you for looking and I would love to see what you will do with it.
Hugs,
Carmin
8.07.2012
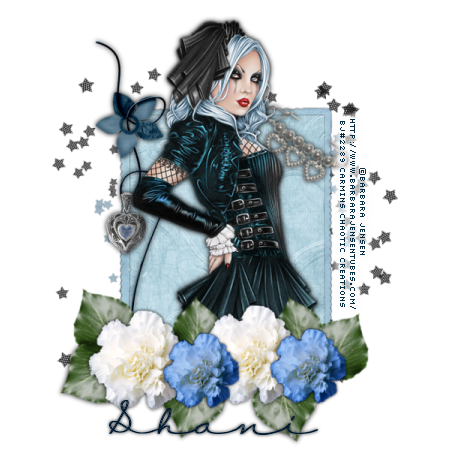
Beautiful Baby Blues
This tutorial is for those that have a working knowledge of PSP. This tutorial was written by me on
August 07,2012 and any resemblance is purely coincidental. I use PSP 9, but any version should work. I do not allow my tutorials to be translated and please do not claim them as your own. If you would like to share the tutorial please send a link to my blog. Thank you!
Things Needed:
Tube/Image of choice: I am using the work of the talented Barbara Jensen which you can purchase here
Kit of choice: I am using a Shani aka Wicked Princess kit called Times Past which is part of a collab which can be purchased here
Plugins: None
Masks/Templates: None
Font: CK Love Note
Let’s Begin:
1. Open a new image 600 x 600 72 DPI this is going to be called our working image
2. Open up a frame of choice ( I used WP_TP_FRAME3.png)
3. Resize by 75% twice
4. Copy and paste as a new layer on our working image
5. With your magic wand click inside your frame
6. Selections- Modify- Expand by 4
7. Open a paper of your choice ( I used WP_TP_PP8.jpg)
8. Paste your paper as a new layer and move below your frame layer
9. Selections- Invert
10. Hit delete on the key board at this time to remove the excess paper
11. Apply a drop shadow to your frame layer to make it stand out from the paper
12. Place your tube to your liking
13. Open WP_TP_LEAF.png and resize to your liking ( I resized by 50% and again by 75%)
14. Paste the leaf as a new layer on our working image
15. Move the leaf to the bottom left of the frame
16. Once satisfied duplicate this layer and move again to your liking
17. You can keep duplicating this layer until you have your leaves placed how you like
18. Now open WP_TP_FLOWER.png and paste as a new layer
19. Move the flower onto the leaves and place to your liking
20. Now keep putting your flowers and leaves across the bottom of your tag
21. I recolored the white carnation using manual color correction to a light blue to match the tag
22. Open WP_TP_WIREDFLOWER.png and paste as a new layer on our working image
23. Move to the left side of our frame to your liking
24. Open WP_TP_HEARTPENDANT.png resize by 50% twice and paste as a new layer on our working image placing over the extra loop in our wired flower
25. Open WP_TP_STARSCATT.png and resize by 75% and paste as a new layer on out working image
26. Now send this layer to the bottom
27. At this point merge all layers visible and resize by 75%
28. Now add your copyright and name
29. There you have it a wonderful new tag
Thank you for doing one of my tutorials. I would love to see your results…
7.30.2012
Pretty In Pink II
This tutorial is for those that have a working knowledge of PSP. This tutorial was written by me on
July 30th 2012 and any resemblance is purely coincidental. I use PSP 9, but any version should work. I do not allow my tutorials to be translated and please do not claim them as your own. If you would like to share the tutorial please send a link to my blog. Thank you!
Things Needed:
Tube/Image of choice: I am using the tubes that are included with the kit which are ©Paci
Kit of choice: I am using SYCLAIRSKULLY by Shani a.k.a. Wicked Princess Scraps which you can buy here at Whimsical Divas
Plugins: None
Masks/Templates: None
Let’s Begin:
1. Open PSP and create a new image 600 x 600 with the resolution set at 72 (we will call this our working image)
2. Open WP_SYS_LARGECIRCLEFRAME.png
3. Resize by 65% and paste as a new layer on our working image
4. Open Paper of choice ( I used paper 9)
5. Click in the center of the frame on our working image with your magic wand
6. Selections- Modify- expand by 10
7. Copy your paper and paste as a new layer on our working image
8. Move your paper layer to the bottom
9. Selections – Invert
10. Now hit delete on your key board
11. Select None
12. Open WP_SYS_CIRCLECLUSTER.png
13. Resize by 65%
14. Paste as a new layer on our working image
15. Now move this layer to the bottom right part of the frame
16. Send this layer to the bottom
17. Now duplicate this layer
18. Image – Flip
19. Open WP_SYS_VINE2.png
20. Resize by 65% and paste as a new layer on your working image
21. Image- Mirror
22. Now move over to the left side of our frame
23. Now using your selection tool (point to point) select part of the vine to delete to make it appear to be wrapping around the frame
24. Now add a drop shadow to the layers of your choice I used 0,0,100,2 black
25. Add a butterfly of your choosing (make sure to resize to make it fit with everything else)
26. Open WP_SYS_SPLAT.png and paste as a new layer on our working image
27. Move this to the top left to cover the top left half of the tag
28. Send this layer to the bottom
29. Duplicate the splat layer
30. Image – Mirror-
31. Image- Flip
32. Now it’s time to add our tube of choice ( I am using one from the kit)
33. Place to your liking
34. Now add your copyright and text
35. That’s it we have a cute tag (add more things if You choose to do so)
Thank you for trying my tutorial. I would love to see your results. Feel free to email me theycallmetig@yahoo.com
7.27.2012
I am getting more motivated :)
Things have been pretty rough for me lately. My fibro and lupus has been kicking my butt in a miserable way and I was losing interest in everything, but Im coming around much more now. I have 2 kits in the works and have requested some of my CT groups kits so now I need to get moving. I am in the middle of a horrible flare up but I really want to get into PSP!!! So here I go... Lets get this party started!!! Im off to play in PSP woot woot!!!