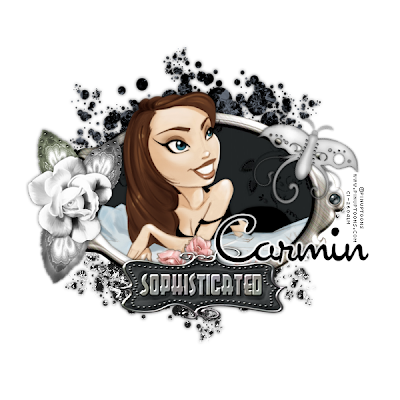
This tutorial is for those that have a working knowledge of PSP. This tutorial was written by me on the 22nd day of July 2010 and any resemblance is purely coincidental. I used PSP 9, but any version should work. I do not allow my tutorials to be translated and please do not claim them as your own. If you would like to share the tutorial please send a link to my blog.
The materials you will need:
Scrap kit: I used JuicyBits PTU kit Sophisticated which you can find here
Tube or tubes of choice: I chose the artwork of Pinuptoons and a license is required to use his work. You may purchase one from CILM.
Lets Begin:
Open Frame 01 Hit Shift D on the keyboard
Close the original
rotate all layers to the right 90 degrees
Image-Canvas size 600x600
Click inside the frame and expand your selection by 5
Open tube of your choosing
Paste tube as a new layer to your liking
Selections- Invert
Hit delete on your keyboard
Do not deselect
Open paper of choice (I used paper02)
Paste as a new layer
Hit delete on your keyboard one time and move this layer to the bottom
Open leaf 01 and leaf 02
Resize one by 60% and leave the other one
Copy and paste as a new layer to the left side of our frame
Flip one of the leaves Moving it to line up with the other leaf ( look at tag for placements)
Open flower 04 and resize by 50% and then again by 80% move to the left side placing on top of the leaves.
Open Glitter Spray 1 and rotate to the left by 90 degrees
Resize by 60% and copy
Paste as a new layer moving slightly to the top
Now move this layer to the bottom so that the glitter looks like its coming out from behind our frame
Open glitter spray 02 rotate to the left by 90%
Resize by 60% copy and paste as a new layer moving this one to the bottom as well
Image mirror
Add drop shadow of your choosing to all layers ( I used 0,0, 100,7 black)
Open WA1 and resize by 60%
Paste as a new layer on our working image and put on the center-bottom of our frame
Open butterfly 01 (or 02) and resize by 50%
Copy and paste as a new layer off to the right side of our frame.
Add any other elements of choice at this time….
Export as a PNG and that’s it we are done…..
No comments:
Post a Comment